RustOS: A Microkernel Built in Rust
RustOS is designed as a simplistic operating system for the x86_64 architecture for educational purposes. It is built from the ground up in Rust and avoids the standard library (no_std) to interface directly with x86_64 hardware. It uses the Limine bootloader and supports basic features such as preemptive multitasking, memory management, and a custom FAT32 filesystem driver. The ultimate goal of the project was to run DOOM and QUAKE natively on the OS, which was successfully achieved.
Watch RustOS Running
This demo shows the OS in action, including the kind of low-level systems work that made running DOOM and QUAKE on bare metal possible.
Getting Started with Rust OS Development
And how you can build your own OS too
To start out I decided what programming language I would use. I went with Rust because it is fast and memory-safe, and I wanted to improve my skills with this language. Next I used a lot of online resources to learn about OS development. I found the OSDev Wiki to be incredibly helpful. From there I picked Limine as the bootloader. I then set up QEMU to test the kernel. As well I used make to automate the process of building and running the kernel.
Technical Stack
- Languages: Rust (Nightly), x86_64 Assembly
- Bootloader: Limine
- Development Tools: Cargo, QEMU (for testing), custom Makefile
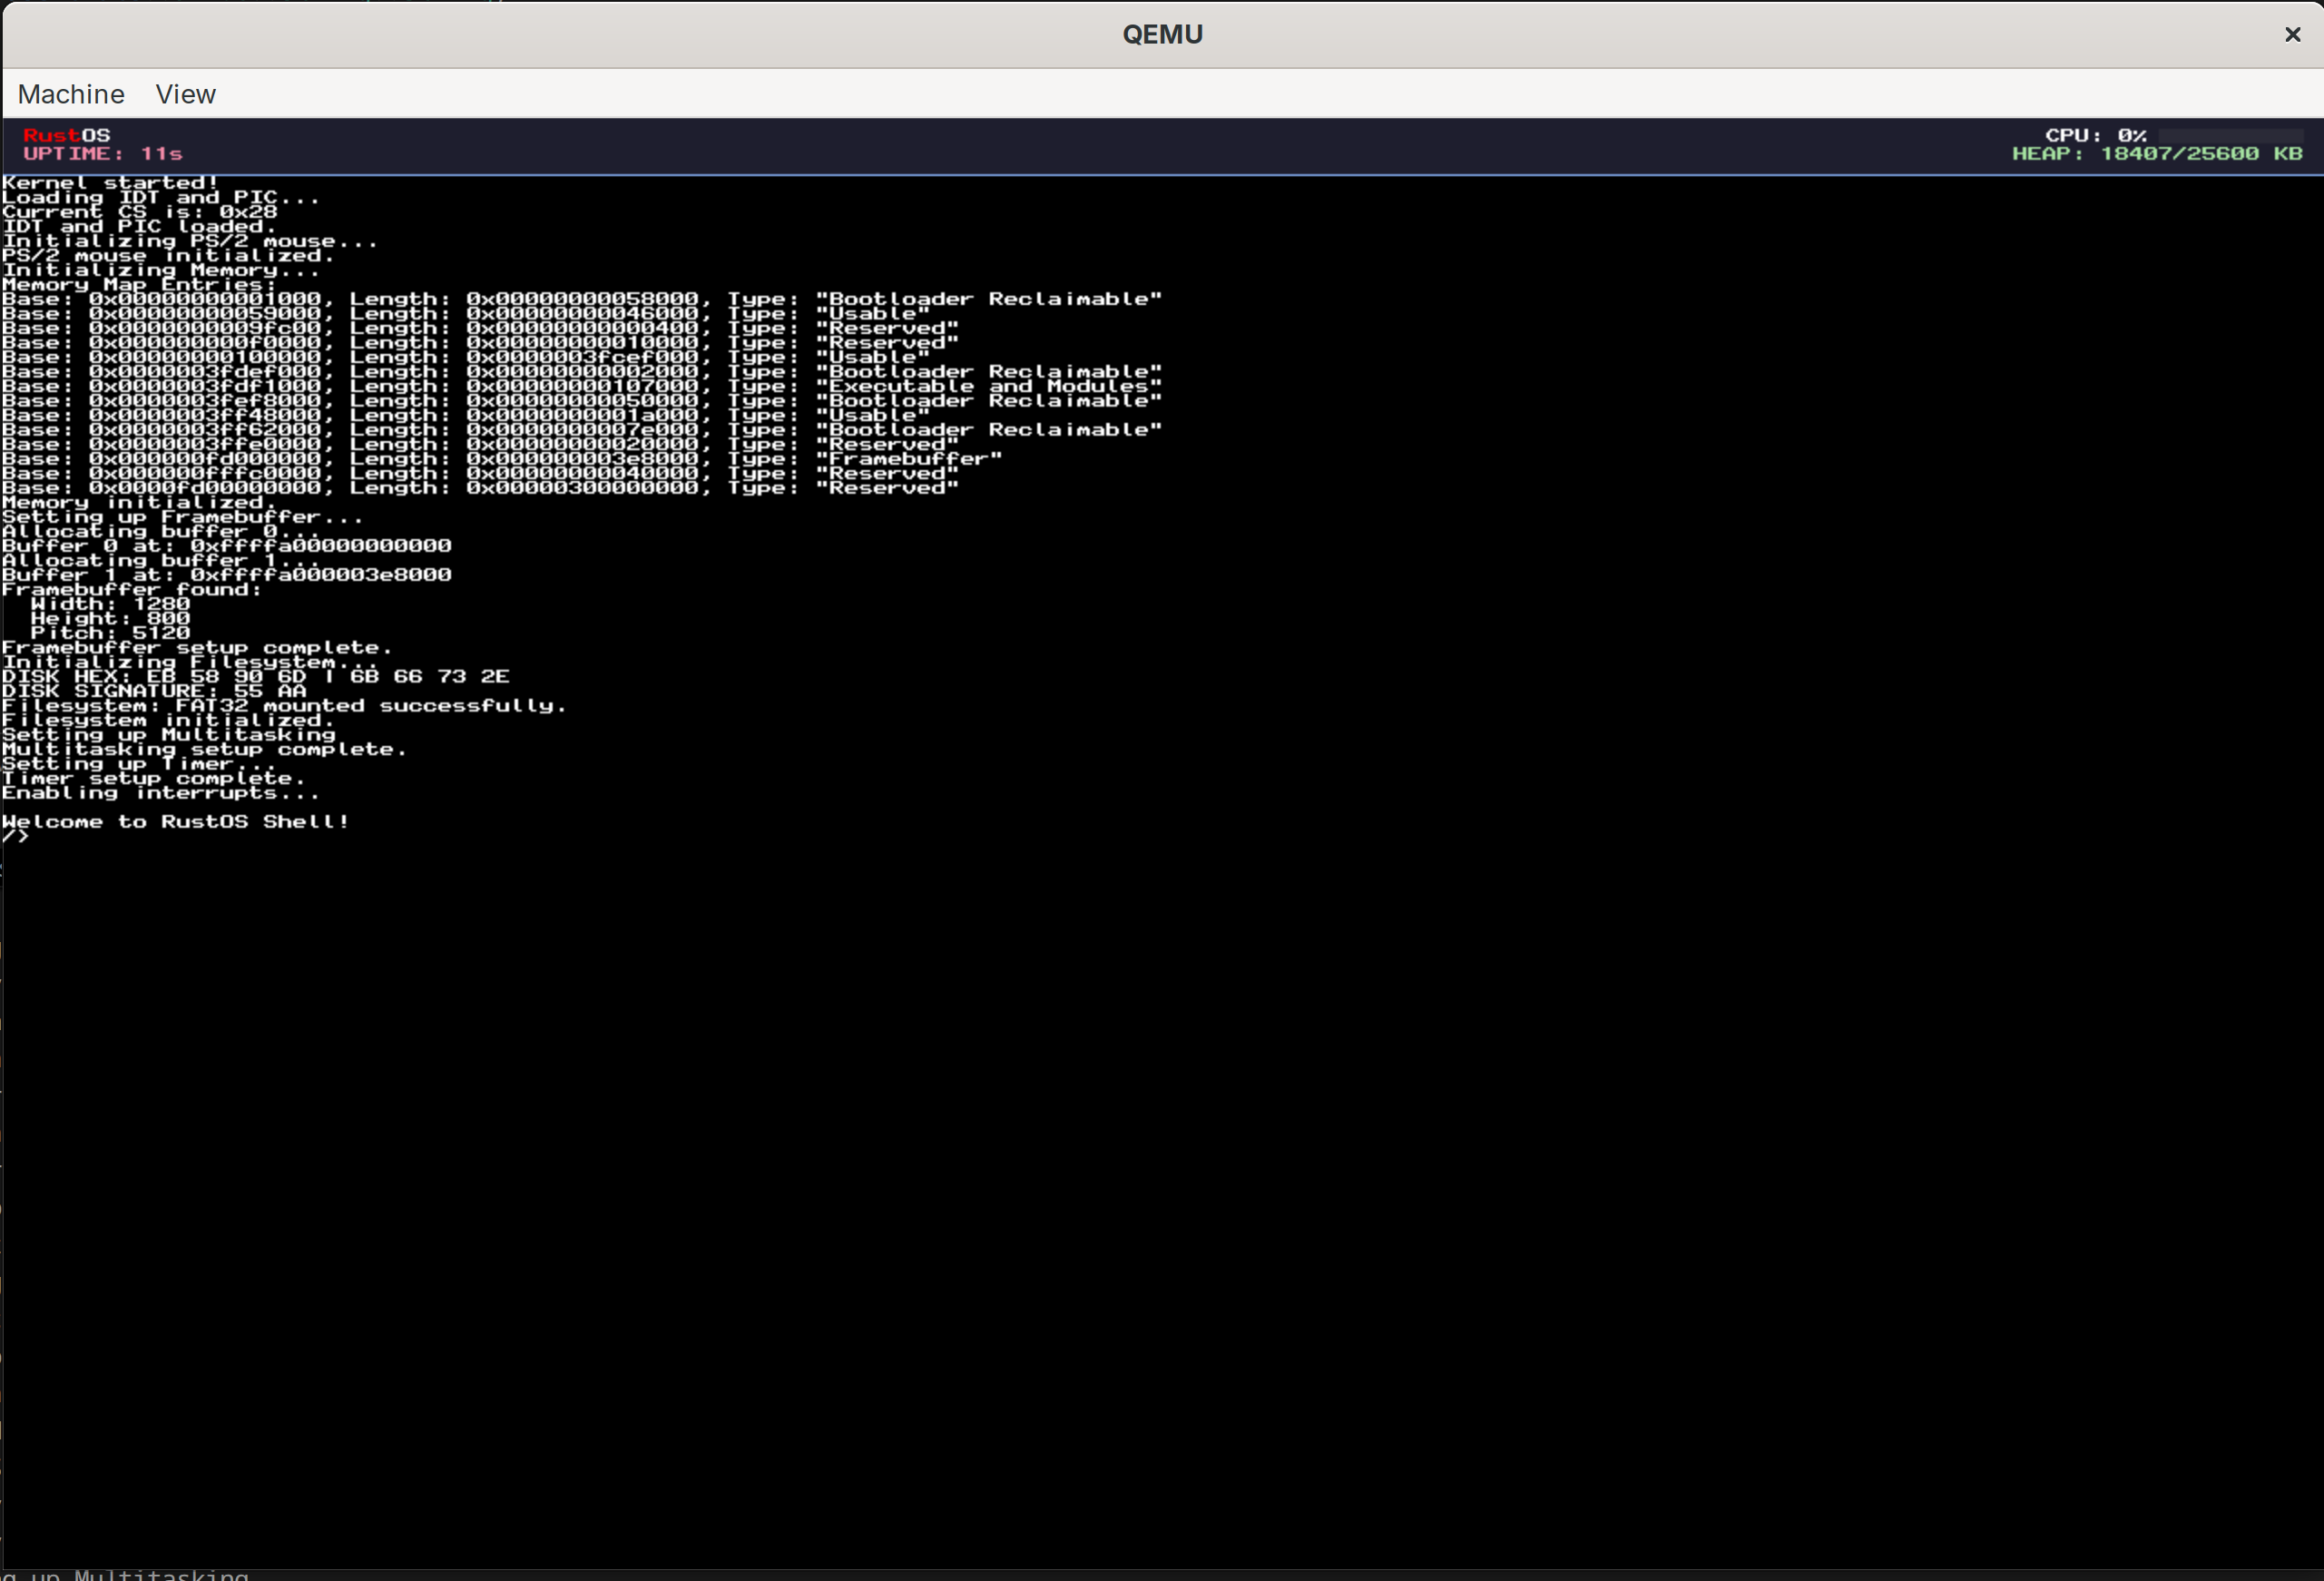
When starting out the hardest part is having little to no feedback for what is happening. Therefore I tried to get the framebuffer working first. To do this I ported over the Drawing In a Linear Framebuffer tutorial from the OSDev Wiki to Rust.
Once this was working it was very helpful as I could now see what was happening in the kernel. I also implemented serial communication and a logger to help with debugging.
// Writing a byte to the serial port
unsafe {
    core::arch::asm!(
        "out dx, al",
        in("dx") SERIAL_PORT,
        in("al") byte,
        options(nomem, nostack, preserves_flags)
    );
}
Once this was implemented I wanted to get the keyboard working. However, like all things in OS development, it was not nearly as simple as I had hoped. What I was missing was the interrupt descriptor table (IDT). This handles all the interrupts for the CPU.
This table essentially maps interrupt numbers to the functions that should be called when that interrupt is triggered. For instance when the keyboard is pressed it sends an interrupt to the CPU. The IDT then tells the CPU to call interrupt handler function. The most complex thing it has to do is save the state of the CPU before calling the interrupt handler and restore it after. That is what the following assembly code does.
isr_common_stub:
        fxsave [rip + INTERRUPT_FPU_SNAPSHOT]
        mov byte ptr [rip + INTERRUPT_FPU_SNAPSHOT_VALID], 1
        push r15; push r14; push r13; push r12
        push r11; push r10; push r9;  push r8
        push rbp; push rdi; push rsi; push rdx
        push rcx; push rbx; push rax

        mov rdi, rsp
        call exception_handler

        // On return, rax contains the new rsp
        mov rsp, rax

        // Restore registers
        pop rax; pop rbx; pop rcx; pop rdx
        pop rsi; pop rdi; pop rbp; pop r8
        pop r9;  pop r10; pop r11; pop r12
        pop r13; pop r14; pop r15

        cmp byte ptr [rip + INTERRUPT_FPU_SNAPSHOT_VALID], 0
        je 2f
        fxrstor [rip + INTERRUPT_FPU_SNAPSHOT]
        mov byte ptr [rip + INTERRUPT_FPU_SNAPSHOT_VALID], 0
    2:

        add rsp, 16
        iretq
Now that the IDT was working I could implement the keyboard driver. This is pretty straight forward (nice surprise). The following code is what I came up with. It just checks to see if the interrupt number is 33 (keyboard interrupt) and then reads the scancode from the keyboard. It also checks if the scancode is for the mouse and if so calls the mouse handler.
if num == 33 {
        let status = ps2_status();
        let scancode: u8;
        unsafe {
            asm!("in al, dx", out("al") scancode, in("dx") 0x60 as u16);
        }
        // If AUX bit is set, this byte belongs to mouse; keep it out of keyboard queue.
        if (status & 0x20) != 0 {
            crate::io::mouse::on_irq_byte(scancode);
        } else {
            crate::io::keyboard::push_scancode(scancode);
        }
    }
This pushes the scancode to a queue. The keyboard driver then reads from this queue and converts the scancode to a character.
Memory Management
Memory management, known by its other name, suffering, is a very important part of an operating system. It is also one of the most complex parts of an operating system. However, getting memory management working especially when using Rust unlocks a lot of potential.
For my OS I decided to use a 3 tiered memory management system.
The Bitmap Allocator
The bitmap allocator is used to track physical memory. It uses the data from Limine to determine which regions of memory are free and which are in use. The bitmap stores this information in a vector of booleans with each boolean representing a 4KB block of memory. Then it performs a next fit algorithm to find a free block of memory when requested.
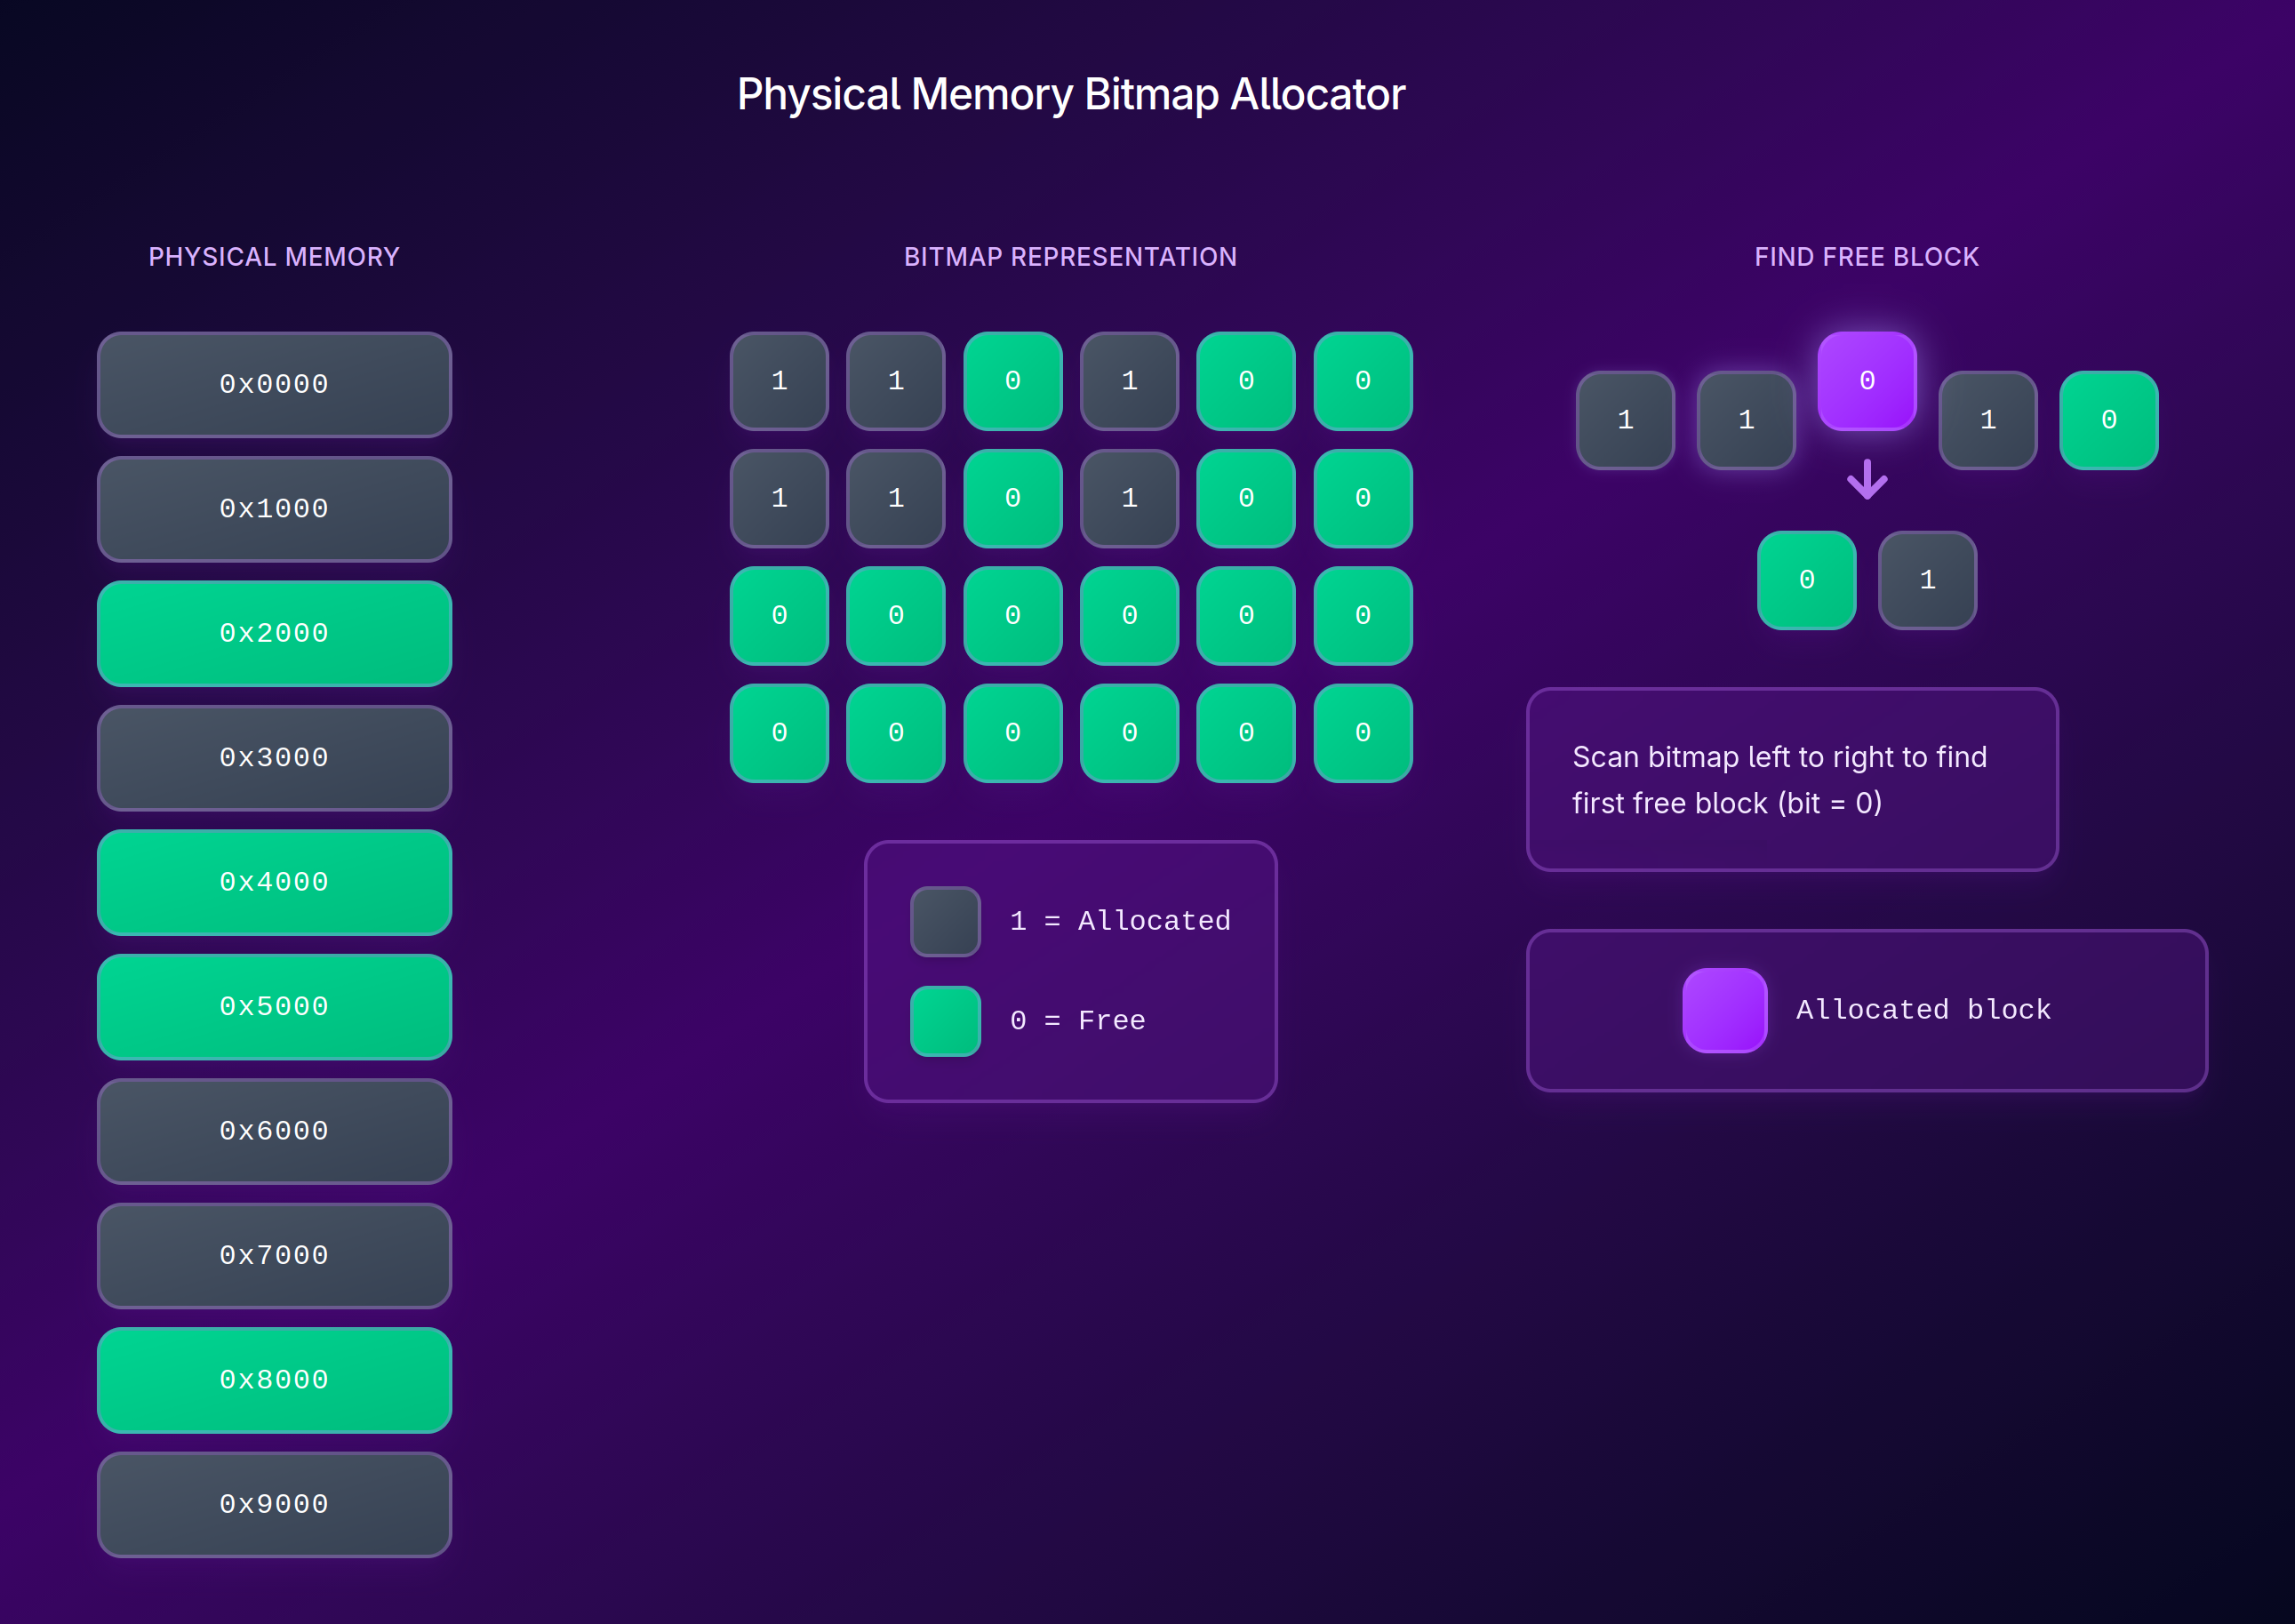
This way we can keep track of which memory is free and which is in use. However now we have a couple of problems we need to solve.
- How do we allocate larger chunks of memory?
- How do we assign specific memory addresses to specific tasks?
- How do we prevent tasks from accessing each other’s memory?
Paging System
The paging system is used to solve the problems mentioned above. It is a system that allows us to assign specific memory addresses to specific tasks and prevent tasks from accessing each other’s memory.
In RustOS we use a Higher Half Direct Map. All this means is that we map the physical memory to the higher half of the virtual memory. This way we can easily access physical memory by just adding the offset to the virtual address. It also supports memory protection using page table flags.
bitflags! {
    #[derive(Clone, Copy, Debug, PartialEq, Eq)]
    pub struct PageTableFlags: u64 {
        const PRESENT = 1 << 0;         // Page is present in memory
        const WRITABLE = 1 << 1;        // Page is writable
        const USER_ACCESSIBLE = 1 << 2; // User-mode can access this page
        const WRITE_THROUGH = 1 << 3;   // Write-through caching enabled
        const NO_CACHE = 1 << 4;        // Caching disabled
        const ACCESSED = 1 << 5;        // Set by CPU on read
        const DIRTY = 1 << 6;           // Set by CPU on write
        const HUGE_PAGE = 1 << 7;       // Map 2MB/1GB page
        const GLOBAL = 1 << 8;          // Global page (not flushed from TLB)
        const NO_EXECUTE = 1 << 63;     // Execute disable
    }
}
Then when we need to map a page the following happens:
- Index Calculation: The virtual address is bit-shifted to find the index for each level of the page table.
- Table Traversal: It walks down the levels
- Fault Tolerance: If a table at any level (P3, P2, or P1) doesn’t exist yet we do the following:
- Allocate a new physical frame from the Bitmap Allocator
- Zero out that frame (avoids garbage data)
- Link the parent table entry to this new physical frame.
- Final Entry: The P1 entry is set to point to the target phys address with the specified flags
- TLB Invalidation: It runs the invlpg assembly instruction to tell the CPU that a translation has changed, clearing the Translation Lookaside Buffer (TLB) cache for that address.
Dynamic Heap Allocator
The top level is the Global Allocator. For this kernel I used the LockedHeap from the linked_list_allocator crate. It is a simple allocator that uses a linked list to keep track of free blocks of memory.
The allocator supports dynamic growth by requesting more memory from the kernel when needed. This is done by calling the sys_sbrk method.
pub fn sys_sbrk(increment: isize) -> *mut u8 {
    let heap_size = ALLOCATOR.0.lock().size();
    let old_end_of_heap = HEAP_START + heap_size as u64;

    if increment == 0 {
        return old_end_of_heap as *mut u8;
    }

    if increment > 0 {
        let mut mapper = paging::get_active_mapper();

        let new_end_of_heap = old_end_of_heap + increment as u64;
        let mut map_ptr = (old_end_of_heap + 0xFFF) & !0xFFF; // align to page boundary

        while map_ptr < new_end_of_heap {
            let phy_fram = allocate_frame().expect("Failed to allocate frame for sys_sbrk");

            let flags: paging::PageTableFlags =
                paging::PageTableFlags::PRESENT | paging::PageTableFlags::WRITABLE;
            mapper.map(map_ptr, phy_fram, flags);
            map_ptr += 0x1000;
        }

        unsafe {
            ALLOCATOR.0.lock().extend(increment as usize);
        }
    }

    old_end_of_heap as *mut u8
}
The Result
We can now use Rust’s Global Allocator atribute to enable standard Rust collection types like Vec, String, and Box.
Preemptive Multitasking
The first step to get preemptive multitasking working is to get the timer interrupt working. After that we can now implement the scheduler. All the scheduler does is keep track of the current task and swap the task when the timer interrupt is called. It is a little more complex than that as we need to save the state of the current task and restore the state of the next task.
PIT Timer Interrupts
The PIT (Programmable Interval Timer) is a hardware timer that can be used to generate interrupts at regular intervals. For RustOS I used a frequency of 1000Hz. This means that the timer interrupt is called 1000 times per second.
pub const TICKS_PER_SECOND: u64 = 1000;
const PIT_BASE_FREQUENCY: u64 = 1193180;

pub fn init_timer() {
    let divisor: u16 = (PIT_BASE_FREQUENCY / TICKS_PER_SECOND) as u16;

    unsafe {
        // Command port: Select Channel 0, Square Wave Mode
        core::arch::asm!("out 0x43, al", in("al") 0x36u8, options(nomem, nostack));

        // Data port: Send low byte then high byte of divisor
        core::arch::asm!("out 0x40, al", in("al") (divisor & 0xFF) as u8, options(nomem, nostack));
        core::arch::asm!("out 0x40, al", in("al") ((divisor >> 8) & 0xFF) as u8, options(nomem, nostack));
    }
}
The Context Switch
This is handled in 3 steps.
-
Start Preemption/Save State: When we get an interrupt to switch tasks we need to save the state of the current task and restore the state of the next task. To do this the assembly code already saves the registers to the stack. So we just save the stack pointer to Task struct.
-
Save FPU/SSE State: Next we handle FPU/SSE state. These registers are important for floating point arithmetic and vector operations and are not saved by the assembly code. So we need to save them manually. If we don’t do this the FPU/SSE state of the previous task will be used by the next task which can cause some weird results.
-
Pick Next Task: The scheduler.schedule function iterates through a VecDeque of tasks. It uses a Round Robin approach, but with a “Sleep” check:
-
Restore State: We restore the FPU/SSE state of the next task and then restore the stack pointer of the next task.
-
Resume Execution: We return from the interrupt and the next task resumes execution.
The Scheduler
The system uses a simple round robin scheduler. This is one of the simplest schedulers to implement and it is a good starting point for a preemptive multitasking system. I made 2 small modifications to the round robin scheduler which is to add a sleep state. This allows a task to request to be put to sleep and not have it be scheduled until it is woken up. The second change was adding a yield function. This allows a task to request to be put to sleep and not have it be scheduled until it is woken up.
pub fn yield_now() {
    unsafe {
        core::arch::asm!("int 0x20"); // Manually trigger the Timer/Scheduler IRQ
    }
}
// The idle task is a task that is run when there are no other tasks to run.
pub fn idle_task() -> ! {
    loop {
        // Increment a global counter of "idle time"
        unsafe { crate::globals::IDLE_TICKS.fetch_add(1, core::sync::atomic::Ordering::Relaxed) };
s
        // Use 'hlt' to stop the CPU until the next interrupt
        // This is crucial: 'hlt' makes the loop pulse at the same rate as the timer
        unsafe {
            core::arch::asm!("hlt");
        }
    }
}
Filesystem
To give the OS a long term memory I implemented a FAT32 filesystem. FAT32 was used as it’s common and simple, it doesn’t require any complex journaling or heavy metadata.
Bridging hardware and software
To read and write to the disk I implemented a ATA PIO (Programmed I/O) driver. While it is much slower than DMA (Direct Memory Access) it is much simpler to implement and it is a good starting point for a simple kernel. This driver was then connected with the simple-fatfs crate which handles the logic of reading and writing to the filesystem. When implementing this I found I ran into some bugs and limitations with the simple-fatfs crate, to solve this I created a local version of the crate with the fixes I implemented.
Changes I made to the crate
- FileProps and ROFile::from_props are public
- file_size = offset immediately after allocating clusters.
- only update file size if offset > self.file_size
These changes allowed for accurate file size tracking and the ability to save small files.
ELF Loader
Loading programs is the core functionality of an OS. To do this we need to implement an ELF loader. The ELF (Executable and Linkable Format) is a common file format for executables, object code, shared libraries, and core dumps. It is used by many operating systems including Linux and Unix.
To implement the ELF loader we need to do the following steps:
- Load the ELF file from the filesystem using our filesystem driver.
- Parse the ELF file to get the program headers and the entry offset.
- Once we have the entry offset we can calculate the entry point of the program like so:
let entry_point = program_image.as_ptr() as u64 + entry_offset;- We do some parsing to allow for parameters to be passed to the program. We pass a pointer to the parameters to the program.
- Then we have a simple task id counter that we increment for each new task and assign the new task that id.
- Finally we create a new task with the entry point and parameters and add it to the scheduler.
System Calls
To allow programs to interact with the kernel system calls are used. You can think of them like an API for the kernel. They allow programs to request services from the kernel such as reading and writing to the filesystem, creating new tasks, and getting the current time.
In RustOS the syscall handler reads the syscall number from rax, arguments from rdi, rsi, and rdx, and then dispatches to the correct kernel service. That gives user programs a small stable ABI while keeping the kernel implementation flexible.
#[unsafe(no_mangle)]
pub extern "C" fn syscall_handler(frame: &mut InterruptStackFrame) -> u64 {
    let syscall_nr = frame.rax;
    let arg1 = frame.rdi;
    let arg2 = frame.rsi;
    let arg3 = frame.rdx;

    match syscall_nr {
        1 => { /* write byte to serial/display */ }
        5 => frame.rax = unsafe { sys_fs_read(arg1, arg2, arg3) },
        6 => frame.rax = unsafe { sys_fs_write(arg1, arg2, arg3) },
        7 => { /* read raw keyboard scancode */ }
        9 => { /* read translated keyboard byte */ }
        10 => { /* blit framebuffer */ }
        11 => frame.rax = crate::timer::get_uptime_ms(),
        12..=20 => { /* filesystem handle + directory syscalls */ }
        21 => frame.rax = crate::io::mouse::take_deltas_packed() as u64,
        22 => frame.rax = crate::io::mouse::get_buttons_mask() as u64,
        _ => serial_println!("Unknown syscall: {}", syscall_nr),
    }

    frame as *const InterruptStackFrame as u64
}
What these syscalls provide
1: writes a byte to both the serial logger and on-screen display queue.2: exits the current task and immediately asks the scheduler to switch to the next runnable task.3and4: terminal-style screen control for clearing the display and moving the cursor.5and6: filesystem reads and writes using raw pointers from userspace.7and9: keyboard input, either as raw scancodes or translated bytes.8: cooperative yield, letting a task give up the CPU before the next timer tick.10: framebuffer blitting (used for copying a block of pixels) for graphics programs.11: uptime in milliseconds, useful for timing and animation.12to20: file and directory operations likeopen,read,seek,close,mkdir,remove, andrename.16and17: enter and exit exclusive screen mode.21and22: mouse movement deltas and button state.
One nice detail in the keyboard syscalls is that input is focus-aware. A task only receives keyboard data if it currently owns focus, which stops background tasks from accidentally stealing input. If the scheduler lock is briefly contended, the handler falls back to allowing the read instead of dropping input on the floor.
The exit syscall also does some cleanup beyond just marking a task as dead. If the exiting task currently owns keyboard focus or the virtual framebuffer, the kernel returns focus to the shell, exits exclusive mode, and releases the framebuffer owner before scheduling the next task. That keeps user programs from leaving the desktop in a broken state after they quit.
This syscall layer ended up being one of the parts that made the OS feel real. Once filesystem, timing, keyboard, mouse, and framebuffer access were all exposed through the same interface, writing userspace programs became much simpler.
Testing everything out
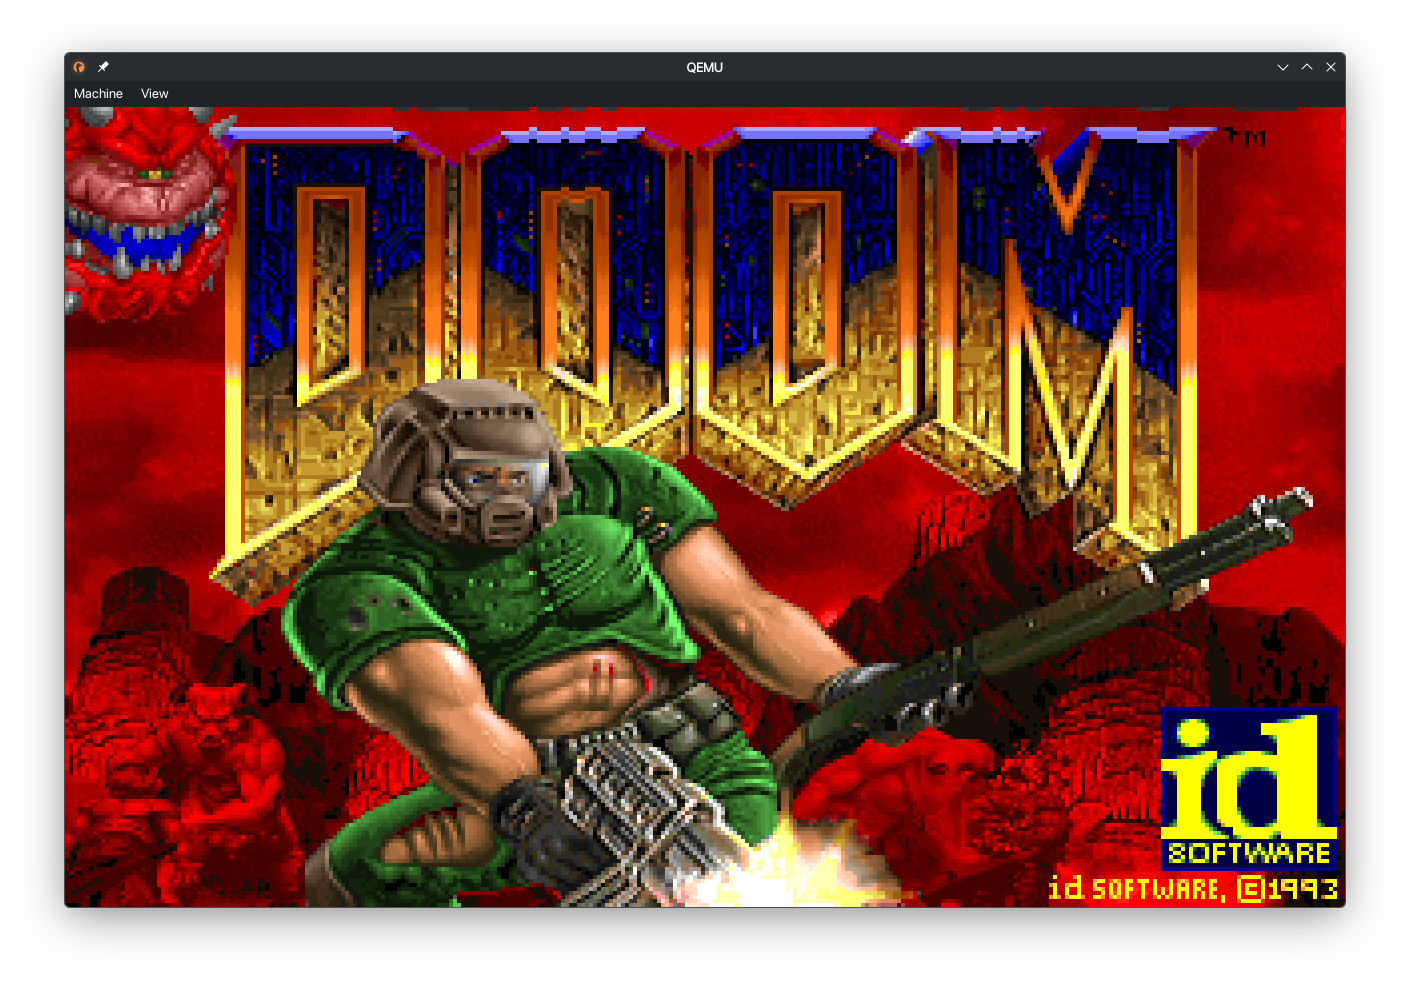
DOOM
The first test was of course DOOM. To do this I used GenericDOOM, a source port of DOOM that is designed to be portable and easy to compile. This is one area where I found AI to be very helpful. Instead of having to port over every C function to Rust I was able to use AI to handle the porting for me. After some tweaks to get it working with the syscalls I had the following result.
Simple Text Editor
Once this was working I wanted to test out the file system. To do this I wrote a simple text editor I called “PICO” since it a smaller (and worse) version of the popular text editor “nano”. This was a good test of the filesystem as it required reading and writing to files. It also was a good test of the keyboard input as it required reading from the keyboard.
CAT
I then wrote a simple cat program that just reads a file and prints it to the screen.
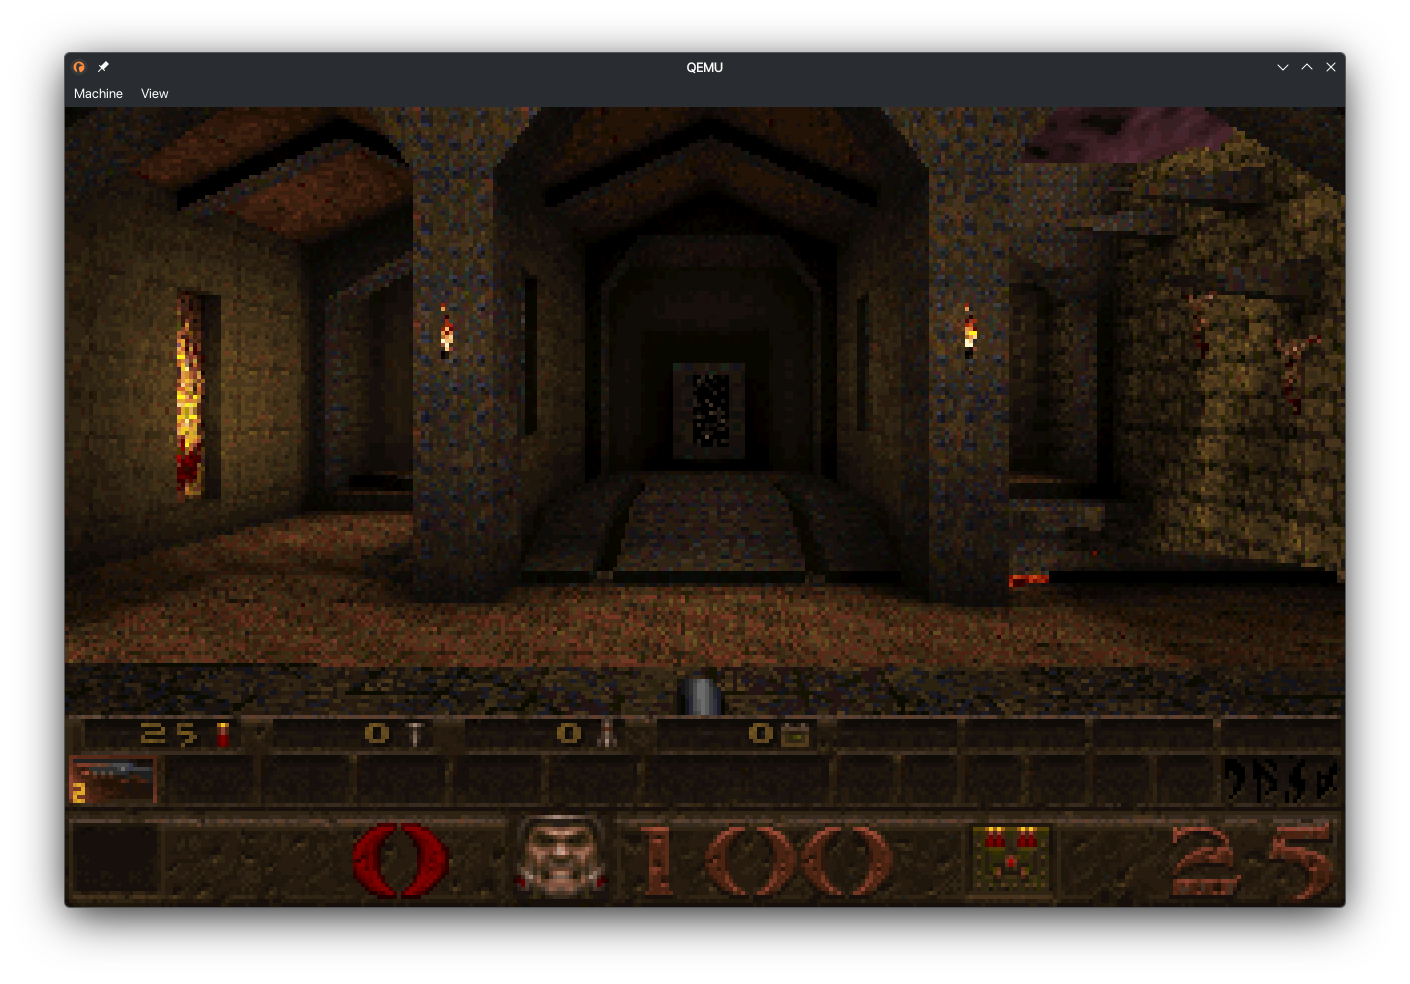
The big challenge - QUAKE
Since I had DOOM working I wanted to try the next step up which was QUAKE. This was a much bigger challenge as QUAKE is a much more complex game than DOOM. I used Naked WinQuake as the source port. This is a fully software rendered version of QUAKE. I used the same approach as DOOM to get it working. However when I booted it up for the first time it showed some crazy graphical glitches in the 3D rendered parts of the game. After some debugging I realized that the AI had made a mistake with some of the math functions which caused crazy values to be passed to the renderer which caused the glitches. After fixing the math functions I was able to get the following result.
Conclusion
Overall this was a really fun project to work on. Seeing it grow from just rendering a single diagonal line to running DOOM and QUAKE was really rewarding. I also improved my skills with Rust since I only had a couple of Rust projects before starting. I also learnt a lot about the low level parts of the OS and Kernel. The biggest learning experience was how the syscall interface works. I also got some real world experience with the challenges such as deadlocks which are incredibly difficult to debug as there is very little feedback when they happen.
To read more about the project and see some of the code I wrote check out the GitHub repository.
AI Use Disclosure
I used AI to help with the following parts of the project:
- Porting C code to Rust and generating some wrappers for the C programs like DOOM and QUAKE.
- Debugging deadlocks and other issues that arose during development.
- Generating some of the boilerplate code for the kernel and drivers.
- AI autocompletion using copilot was used throughout the project to speed up development and reduce the amount of boilerplate code I had to write.
- Automatically refactoring code to improve readability and maintainability.
- Finding deadcode I had forgotten about and removing it to reduce clutter and confusion.
- General research and learning about OS development concepts and best practices.
Comments (...)
Loading comments...
Leave a Comment
Could not post comment. Please check your inputs.